Soft, Fluffy Honey Wheat Bread for Just a Couple of Bucks
All recipes are rigorously tested in our Nashville Test Kitchen to ensure they are easy, affordable, and delicious.
- 2 tsp active dry yeast or instant yeast ($0.34)
- 2 Tbsp honey (divided, $0.50)
- 1.5 cups whole wheat flour (divided, $0.27*)
- 1.25 cup warm water ($0)
- 3 Tbsp olive oil ($0.66)
- 1.5 cups all-purpose flour (divided, $0.27*)
- 1/2 Tbsp salt ($0.05)
- Stir the yeast and 1 Tbsp of the honey into the warm water until dissolved, then set it aside for about five minutes to allow the yeast to activate. A thick layer of foam should develop on the surface of the water.
- While waiting for the yeast to bloom, stir together 1 cup of the whole wheat flour with the salt.
- Once the yeast is foamy, add the rest of the honey (1 Tbsp) and the olive oil and stir to combine. Pour the yeast water into the bowl with the flour and salt, then stir until combined. Add ½ cup more of whole wheat flour and stir until combined again.
- Now start adding all-purpose flour, ½ cup at a time, until you can no longer stir the dough with a spoon. At that point, turn the dough out onto a floured surface and begin to knead all-purpose flour into the dough, a little at a time.
- Knead the dough for about five minutes, slowly adding flour as you knead, or until the dough no longer sticks to your hands, but is still fairly pliable. I used 1.5 cups all-purpose flour total, but the total flour amount will vary with the type of flour used and relative humidity in the room.
- Place the kneaded dough back into the mixing bowl and cover with a cloth. Let the dough rise at room temperature for about an hour, or until it has doubled in size.
- Lightly coat a bread pan with oil. Punch the dough down to deflate, then take the dough out of the bowl. Shape the dough into a log about the same length of your bread pan.
- Place the shaped dough in the bread pan and let it rise for anohter hour, or until it has risen about 2-inches above the edges of the bread pan.
- Preheat the oven to 375ºF. Once fully preheated, add the risen bread and bake for 30 minutes, or until the bread is deeply golden brown and it sounds hollow when tapped.
- Remove the bread from the oven and let it cool just a few minutes (to make it easier to handle), then carefully remove the bread from the pan to fully cool.
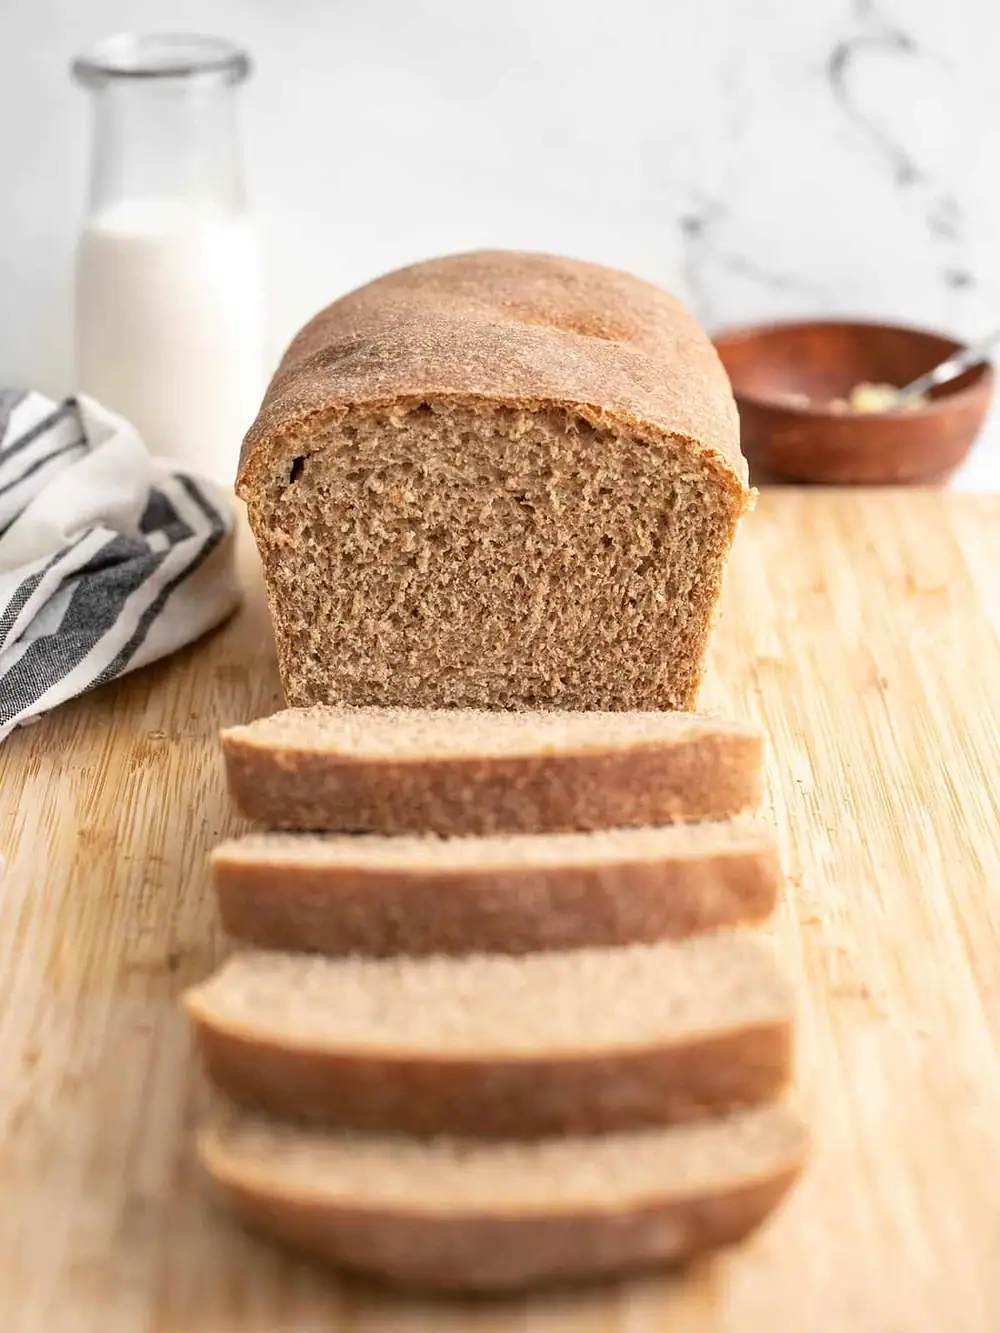
- Once cool, slice and serve your delicious homemade bread!
Grocery prices just keep rising and we’re all feeling it, so I decided to revisit some of my old bread recipes. Because if there ever was a time to learn how to make homemade bread, it’s now!
It only takes a couple of dollars to make this super delish homemade honey wheat bread that is soft, fluffy, flavorful, and perfect for toast or sandwiches. And while it does take some time to make a loaf of bread, most of that is hands-off time that you can use to tend to other business. 😉
“I’ve made this bread about 5 times now and it is SO delicious and incredibly easy! A loaf doesn’t even last an entire 24 hours in my house..
I usually make sourdough but sourdough sandwich bread just isn’t a pillowy soft as yeast risen and this is now my go to for delicious sandwich bread 😋”
How to Make Honey Wheat Bread Step-By-Step Photos
Prep the yeast: Start by dissolving 1 Tbsp honey and 2 tsp instant yeast or active dry yeast in 1.25 cups of warm water. Set the mixture aside to allow the yeast to bloom.
It should develop a thick layer of foam on the surface. Make the dough: While waiting for the yeast to bloom, add 1 cup whole wheat flour to a bowl with ½ Tbsp salt and stir to combine.
Once the yeast has bloomed, stir another 1 Tbsp honey and 3 Tbsp olive oil into the yeast water, then pour that mixture into the bowl with the flour and salt. Stir to combine.
Stir another ½ cup of whole wheat flour into the dough. Now start adding in all-purpose flour, ½ cup at a time until you can no longer stir the dough with a spoon. When a shaggy ball of dough forms that can no longer be stirred with a spoon, it’s time to turn the dough out onto a floured surface to knead.
Knead the dough: Begin kneading in more all-purpose flour a little at a time. Knead for about five minutes, or until the dough no longer sticks to your hands, but is still pliable. I used about 1.5 cups all-purpose flour in total, but the total flour amount can vary depending on the type of flour used and the relative humidity in the room.
You can also use a standmixer with a dough hook attached. Let it rise: Place the kneaded dough back into the mixing bowl and cover it with a towel. Let the dough rise at room temperature for one hour, or until doubled in size.
Shape the dough: Once doubled in size, punch the dough down to deflate. Remove the dough from the bowl and shape it into a log the same length as your bread pan. Let it proof: Lightly coat a bread pan with olive oil then place the shaped dough inside.
Let the bread rise for another hour, or until it has risen about two inches above the top of the bread pan. Bake: Preheat the oven to 375ºF.
Once the bread has risen, transfer the bread to the oven and bake for 30 minutes, or until the crust is deeply brown and sounds hollow when tapped. Let it cool: After 30 minutes, remove the bread from the oven.
Let it cool for just a few minutes to make it easier to handle, then carefully remove it from the bread pan to finish cooling. Once cooled, slice and serve the bread, or store it for later! Recipe Success Tips!
- This recipe starts with the basic yeast bread ingredients: flour, salt, and yeast. Then I added a little honey to give the bread just a hint of sweetness and a little olive oil, which helps keep the bread (and the crust in particular) nice and soft. And I used a combination of whole wheat and all-purpose flour to keep the texture light and fluffy.
- You can use just whole wheat flour, but the bread will be heavier and denser since whole wheat absorbs more moisture. You’ll also need to adjust the ratios in the bread slightly. For the best texture, I recommend using a 50/50 mix of whole wheat flour and all-purpose flour for the best results.
- Don’t skip the kneading process (and knead for enough time!). Kneading builds gluten, which gives the bread structure and helps it rise properly. If you cut it short, you’ll likely end up with a dense loaf. Aim for about 5 minutes or until the dough is smooth, elastic, and no longer sticky.
- Preheat your oven! Whether you’re baking this delicious honey wheat bread, a simple banana bread, or anything in between, starting with a hot oven is key to getting the right rise, texture, and golden crust.
Serving Suggestions
Slather a slice of this warm, homemade toast with pumpkin butter for a cozy, flavorful treat.
The subtle sweetness of the honey wheat bread pairs beautifully with the spiced richness of the pumpkin. You can also take it in a totally different direction by using it to make Air Fryer cinnamon toast—just add butter, cinnamon, and a sprinkle of sugar for a quick, nostalgic snack.
Or turn it into pizza melts or use it as a base for our strawberry chicken salad. It’s a versatile loaf that makes every bite a little more exciting!
Storage Instructions
It’s very important to let this homemade bread cool completely to room temperature before storing to prevent trapping steam and creating condensation. It doesn’t contain preservatives like store-bought bread, so you’ll need to either consume the bread quickly or freeze it for longer storage. (Or make bread pudding with the leftovers!)
- Store at room temperature: Wrap the bread in cloth or paper to allow just enough airflow to prevent moisture build-up. It’ll last about 2-3 days stored at room temperature. Slice just before serving.
- Store in the fridge: This is my preferred method because I don’t usually eat bread that quickly. Bread stored in an airtight container in the refrigerator will stay good for about 5-6 days.
- Store in the freezer: I suggest slicing the bread prior to freezing so you can thaw or use 1-2 slices at a time as needed without thawing the entire loaf. I often toast my slices straight from the freezer for convenience! Make sure to freeze the bread in an airtight, heavy-duty, freezer-safe container (like a freezer bag).