No-Bake Raspberry Cloud
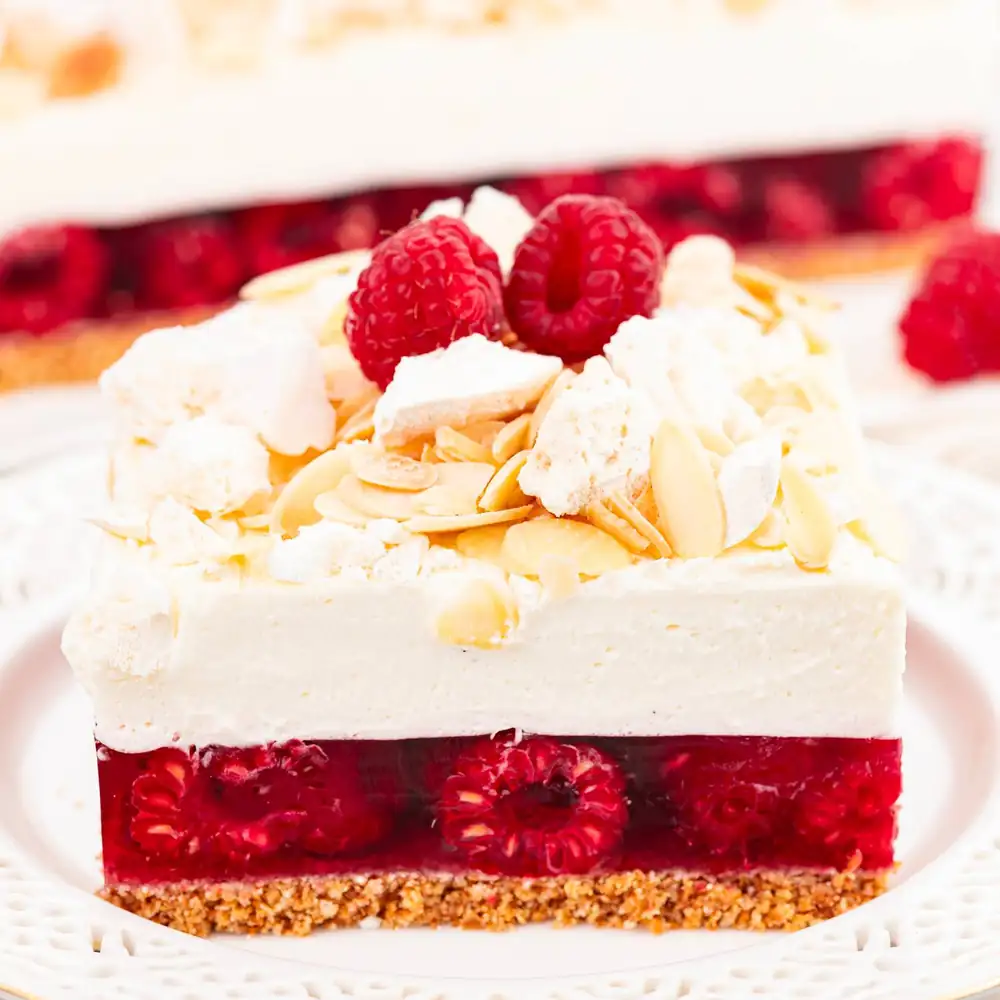
This no-bake Raspberry Cloud Cake is a culinary gem. With just a few basic ingredients, including cookies, jelly, raspberries, mascarpone cheese, meringues, and almond flakes, you can create this delightful dessert.
Preparation time: 3 hours Minimum cooling time: 6 hours Number of servings: 20 x 30 cm baking tin - over 2 kg In 100 g of dough: Energy value 218 kcal Carbohydrates 18 g - Of which sugars 13 g Protein 3 g Fats 15 g.
- 200 g digestive cookies (oat, whole grain)
- 70 g real, soft butter
- 2 classic raspberry jellies
- 2.5 cups of boiling water - 625 ml
- 400 g fresh or frozen raspberries
- 500 ml of 30% heavy cream - well chilled
- 250 g mascarpone cheese - well chilled
- 50 g powdered sugar - about 3 tablespoons without a heap
- 1 vanilla pod or a teaspoon of vanilla paste or essence
- 50-70 ml boiling water
- 2 teaspoons of powdered gelatin
- 50 g mini meringues - homemade or store-bought
- 30 g roasted almond flakes
No-Bake Raspberry Cloud
Place 200 grams of cookies in the bowl of a food processor. Blend until finely ground. If you have a small bowl and a low-powered appliance, I recommend crushing a few cookies at a time and transferring the ground cookies to the bowl. If you don't have a food processor, you can place the cookies in a bowl and crush them using a wooden pestle with a round attachment, or place them in a ziplock bag and crush them with a rolling pin. Add 70 grams of softened butter to the ground cookies. Mix thoroughly.
Prepare a 20 x 30 cm baking pan and line it with baking paper. Line the bottom and sides of the pan with parchment paper and secure the rim. To ensure the paper holds together, grease the inside of the sides with soft butter. Place higher strips of baking paper on the greased sides (I used parchment paper on the bottom and foil on the edges). Transfer the cookie dough (it will be quite loose) to the pan and pat it down to even out the surface. Store the pan in the refrigerator.
Tip: You can replace the cookie base with biscuits or sponge cakes (round or oblong). You can also use a 28 cm springform pan or a 24 x 24 cm springform pan.
Bring 2.5 cups of water to a boil. Pour two packages of raspberry jelly into the bowl of boiling water and stir until the gelatin is completely dissolved. Stir constantly until the liquid is smooth and free of gelatin particles. Set aside to cool slightly.
Tip: Buy tried-and-true, high-quality jelly (not too sour). One sachet of jelly weighed 77 grams. The jelly packaging should state that it's a jelly that dissolves in 500 ml of boiling water. Note: We dissolve our jelly in a smaller amount of boiling water – that's correct.
Add about 400 grams of raspberries to the still-liquid, but only slightly warm jelly. I wash fresh raspberries gently in cold water beforehand, then pat them dry with a paper towel. If you have frozen raspberries, I recommend thawing them naturally, pouring off the melted glaze, and then adding the fruit to the still-liquid jelly.
Tip: If you use strawberry-flavored jelly instead of raspberry jelly, you can substitute strawberries for the raspberries. If you use forest fruit jelly, use blueberries or wild berries. If you use peach jelly, combine apricots or canned peaches.
Stir the raspberry jelly occasionally to check if it's starting to set. To speed up the setting process, keep the bowl in the refrigerator. Once the raspberry jelly begins to set and has the consistency of a thick jelly, you can spread it on the base. Before doing so, however, I recommend lining the inside rim of the pan with strips of baking paper. After spreading the fruit jelly, return the cake pan to the refrigerator.
Tip: Never rush pouring jelly onto the cake base. Jelly that's too runny will soak into the cake and even leak out of the pan. After spreading the jelly over the cake, gently smooth the surface and, if necessary, add fruit to evenly cover the entire cake.
In a tall container or a larger, deep bowl, combine: 500 ml of well-chilled 30% whipping cream, which is a whole carton of heavy cream; 250 grams of well-chilled mascarpone cheese; 50 grams of powdered sugar, which is about 3 tablespoons without the top; and the seeds scraped from one vanilla pod. Begin whipping the cream immediately. Start by setting the mixer to a low speed. After a while, increase the speed until it reaches maximum power. Whipping the cream may take a minute or a little longer, or even less. Be careful not to overwhip, as the cream will begin to curdle and separate into buttermilk and butter. How quickly you achieve perfectly whipped cream depends on the fat content of the cream, its chilling, and the power of your mixer.
Tip: Instead of vanilla seeds, you can add a teaspoon of vanilla paste or essence. Alternatively, you can also add a tablespoon of ground vanilla sugar.
In a separate container, place 2 teaspoons of powdered gelatin. Pour 50-70 ml of boiling water over the gelatin. Stir until the gelatin is completely dissolved. Once cooled (liquid gelatin may still be slightly warm, but still liquid), pour the gelatin into the bowl with the whipped cream and mix immediately. Mix briefly, just until the gelatin and cream are combined. I do this in a few seconds using a mixer on the lowest speed. Wait a moment for the cream mixture to begin to thicken slightly, then pour it over the jelly. Spread the cream mixture evenly over the entire surface of the cake, for example, using a flat cake spatula. Return the cake pan to the refrigerator.
Tip: You can omit the gelatin. Replace the 30% whipping cream with 36% whipping cream. The whipped cream layer will be stiff enough to support the meringue, but more delicate than the gelatin layer.
Finally, all that's left is to crumble the mini meringues and toast the almond flakes, which you'll use to cover the top of the cake. Pour 30-50 grams of almond flakes (I used 30 grams) into a dry frying pan. Set the heat to medium and toast the flakes until very lightly golden brown. I recommend constantly monitoring the pan and stirring the flakes with a wooden spatula to ensure they brown evenly and not too much. This usually takes about 5-10 minutes. Transfer the toasted, fragrant flakes to a bowl to cool faster.
First, spread the mini meringues crushed in your hands on the dough, then sprinkle everything with toasted almond flakes.
Tip: I highly recommend my recipe for classic meringues and vegan meringues.
Let the no-bake raspberry cloud chill for a few hours until all layers have completely set. Store it in the refrigerator, preferably under a glass dome. It will retain its freshness and perfect flavor for at least 6-7 days.
Tip: If you plan to prepare the cake, for example, two days in advance, I recommend placing the meringues with roasted almonds on the cake the day of serving. After some time, the meringues may begin to dissolve in the moist cheese filling.