No-Knead Salt Bread
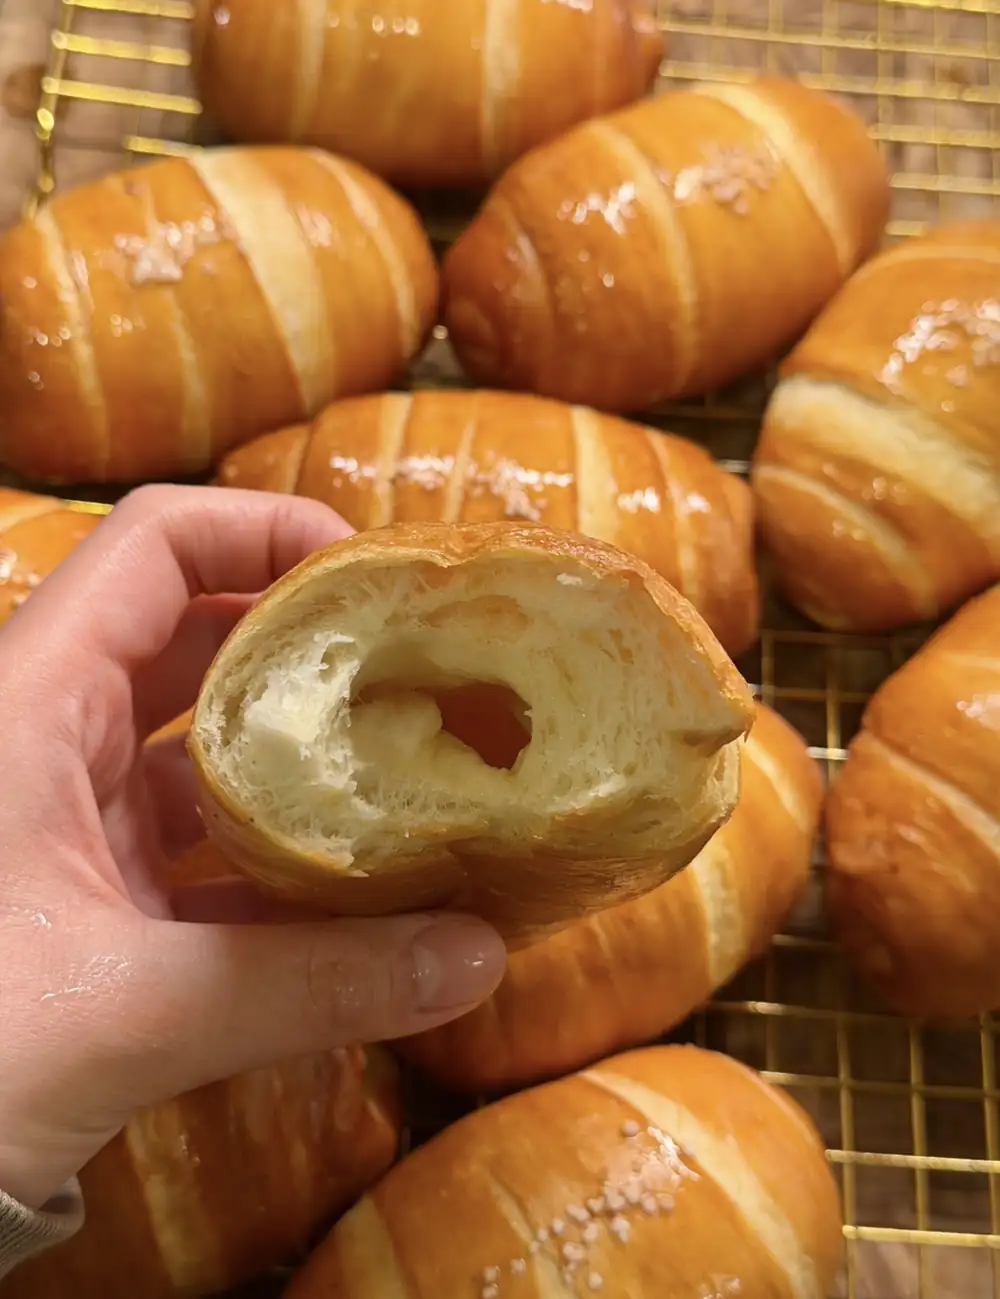
Este es el mismo pan de sal que tanto te gusta: panecillos suaves y esponjosos con una base crujiente y mantecosa y un centro de mantequilla fundida, hecho completamente sin batidora. Los mismos ingredientes, las mismas proporciones, el mismo sabor.
- 400 g bread flour
- 120 g cake flour
- 26 g sugar
- 10 g salt
- 30 g non-fat milk powder
- 7 g instant dry yeast
- 365 g water (cold tap water)
- 40 g softened unsalted butter
- 12 x 15 g butter chunks (I cut 1 stick of butter into 8 pieces so you'll need around 1.5 stick of butter)
- In a large bowl, combine the bread flour, cake flour, sugar, salt, milk powder, and yeast. Add the water and mix until no dry flour remains. The dough will not be smooth and should be sticky.
- Cover and rest for 25 minutes.
- Add the softened butter in 2–3 additions. Gently knead by hand until the butter is fully incorporated and the dough comes together into one cohesive mass. The dough does not need to be smooth at this stage.
- Cover and rest for 25 minutes.
- Perform 3 sets of stretch and folds, spaced 25 minutes apart.For each set:* Fold top of dough to center, bottom to center* Fold left to right* Fold right to left* Flip seam-side downCover and rest 25 min
- The dough will become smoother and more elastic with each fold. After the 3rd stretch and fold you want to make sure the surface of your dough looks smooth. If even after the last stretch and fold it is not quite there yet/doesn't pass the windowpane test, do some coil folds, slap and folds, and rounding/tuck and turns until it appears smooth.
- After the final fold, let the dough rest undisturbed until it increases to about 1.5× its volume. The dough should feel lighter, smoother, and slightly jiggly.
- Degas the dough and divide into 80 g portions.
- Roll each into a smooth ball, cover, and let rest for 15 minutes (starting from the first ball you shaped).
- Roll each ball into a long teardrop shape, keeping the top wider and the bottom narrower.
- Start with the bottom half of the tear drop shape (narrower part.) Use a rolling pin to flatten the bottom half while using the other hand to slightly pull downward.
- Do the same for the upper half to flatten the wider end into a triangle base about the same width as your butter stick.
- Place a butter stick at the wide end and roll down toward the point, gently tugging for tension.
- Keep the seam side down on the tray.
- Place rolls on non-stick baking tray (no parchment paper) with space between them.
- Cover and let rise until doubled in size.
- Preheat oven to 450°F (232°C).
- Spray rolls lightly with water and sprinkle pretzel salt on top.
- Just before baking, spray each roll generously (about 20 pumps) for added steam.
- Lower oven to 400°F (204°C) and bake for 12-15 minutes, rotating the tray halfway if needed for even browning.
- Enjoy hot out of the oven — the bottoms will be crisp and buttery, the insides fluffy and soft.
This is the same salt bread you love — soft, fluffy rolls with a buttery crisp bottom and a molten butter center — made entirely without a stand mixer. Same ingredients, same ratios, same flavor. Just a gentler method using rest time and stretch and folds to build the gluten instead of a machine. If you’ve been wanting to make salt bread but don’t have a mixer, this one is for you.
My Latest Videos
No-Knead Salt Bread: All the Flavor, None of the Equipment.
The most common question I get on my original salt bread post is whether you can make it without a stand mixer. After a lot of testing I can confidently say yes, and the results are genuinely comparable. This method works by letting time do what the mixer normally does — rest periods and stretch and folds slowly build gluten strength without any mechanical help. You’ll notice a couple of ingredient changes from my original salt bread recipe too. We use cool tap water instead of ice water, and softened butter instead of cold butter. These aren’t random swaps, they’re intentional adjustments that account for the fact that without a mixer, your dough generates almost no friction heat during mixing. Everything else is identical.
THE DOUGH
- 400g bread flour
- 120g cake flour
- 365g cold water
- 26g sugar
- 10g salt
- 30g non-fat milk powder
- 40g cold unsalted butter
- 7g instant dry yeast
FOR SHAPING AND BAKING
- 12 x 15g butter chunks (about 1.5 sticks of butter, cut into even pieces)
- Pretzel salt for topping
The Dough
This is the exact same dough as my original salt bread recipe with two intentional changes. First, we use cool tap water instead of ice water. In the original recipe ice water is needed to offset the heat generated by a stand mixer during long kneading sessions. Since we’re not using a mixer here, there’s almost no friction heat, so cool tap water keeps the dough in a workable temperature range without making it too cold to ferment properly. Second, we use softened butter instead of cold butter. Without the mechanical force of a mixer to drive cold butter into the dough, softened butter incorporates cleanly with minimal handling and coats the existing gluten without tearing it. The target final dough temperature for this method is 72 to 75°F rather than the 78 to 80°F you’d aim for with a mixer. For a more in depth explanation of dough temperature and how to calculate the right water temperature for your specific kitchen and mixer, check out the water temperature guide in my original salt bread recipe.
The Butter Chunks
Same as the original — each roll gets one 15g chunk of cold butter placed at the wide end before rolling. The butter melts during baking and pools at the bottom of each roll, frying it from underneath for that signature crispy base. Keep these in the fridge until the moment you’re ready to shape so they stay firm. Everything from shaping onward is identical to the original salt bread recipe, so if you’ve made that one before this part will feel very familiar.
How To Make No-Knead Salt Bread
- In a large bowl combine bread flour, cake flour, sugar, salt, milk powder, and yeast. Add the cool tap water and mix until no dry flour remains. The dough will be shaggy and sticky — this is normal.
- Cover and rest for 25 minutes. This rest lets gluten begin forming on its own before we add any fat.
- Add the softened butter in 2 to 3 additions, gently kneading by hand until fully incorporated and the dough comes together into one cohesive mass. It doesn’t need to be smooth yet.
- Cover and rest for another 25 minutes.
- Perform 3 sets of stretch and folds, spaced 25 minutes apart. For each set: fold the top of the dough to the center, then the bottom to the center, then left to right. Flip seam side down, cover, and rest 25 minutes.
- The dough will become noticeably smoother and more elastic with each fold. After the third set you want the surface to look smooth and the dough to pass the windowpane test — stretch a small piece slowly between your fingers until it forms a thin translucent sheet without tearing. If it’s not quite there after the third fold, do a few extra coil folds or slap and folds until it gets there.
- After the final fold, let the dough rest undisturbed until it increases to about 1.5x its original volume. It should feel lighter, smoother, and slightly jiggly when you shake the bowl.
- Everything from shaping onward is identical to my original salt bread recipe. Degas the dough and divide into 80g portions. Roll each into a smooth ball, cover, and let bench rest for 15 minutes starting from the first ball you shaped.
- Roll each ball into a long teardrop shape. Flatten the narrow bottom half with a rolling pin while gently pulling downward, then flatten the wider top into a triangle base about the width of your butter chunk.
- Place a butter chunk at the wide end and roll down toward the point with gentle tension. Place seam side down on a non-stick baking tray with no parchment paper, leaving space between each roll.
- Cover and let rise until doubled and puffy.
- Preheat oven to 450°F. Spray rolls lightly with water and sprinkle pretzel salt on top. Just before loading into the oven, spray each roll generously with about 20 pumps of water. Lower oven to 400°F and bake for 12 to 15 minutes, rotating halfway if needed.
- Eat immediately for the crispiest bottoms.
Storage and Reheating
No-knead salt bread stores and reheats exactly the same as the original. Skip the fridge — it dries out the dough.
Freezing: let rolls cool completely, place in an airtight bag, and freeze for up to 2 months.
Reheating from room temperature: air fry at 350°F for 2 to 4 minutes.
Reheating from frozen: air fry at 350°F for 5 to 8 minutes, flipping halfway so the bottom crisps back up. They come back almost as good as fresh.
Ingredients
- 400 g bread flour
- 120 g cake flour
- 26 g sugar
- 10 g salt
- 30 g non-fat milk powder
- 7 g instant dry yeast
- 365 g water cold tap water
- 40 g softened unsalted butter
- 12 x 15 g butter chunks I cut 1 stick of butter into 8 pieces so you’ll need around 1.5 stick of butter
Mix (no butter yet)
- In a large bowl, combine the bread flour, cake flour, sugar, salt, milk powder, and yeast. Add the water and mix until no dry flour remains. The dough will not be smooth and should be sticky.
- Cover and rest for 25 minutes.
Add the butter
- Add the softened butter in 2–3 additions. Gently knead by hand until the butter is fully incorporated and the dough comes together into one cohesive mass. The dough does not need to be smooth at this stage.
- Cover and rest for 25 minutes.
Stretch & fold
- Perform 3 sets of stretch and folds, spaced 25 minutes apart.For each set:* Fold top of dough to center, bottom to center* Fold left to right* Fold right to left* Flip seam-side downCover and rest 25 min.
- The dough will become smoother and more elastic with each fold. After the 3rd stretch and fold you want to make sure the surface of your dough looks smooth. If even after the last stretch and fold it is not quite there yet/doesn't pass the windowpane test, do some coil folds, slap and folds, and rounding/tuck and turns until it appears smooth.
Bulk fermentation
- After the final fold, let the dough rest undisturbed until it increases to about 1.5× its volume. The dough should feel lighter, smoother, and slightly jiggly.
Divide & bench rest
- Degas the dough and divide into 80 g portions.
- Roll each into a smooth ball, cover, and let rest for 15 minutes (starting from the first ball you shaped).
Shape the rolls
- Roll each ball into a long teardrop shape, keeping the top wider and the bottom narrower.
- Start with the bottom half of the tear drop shape (narrower part.) Use a rolling pin to flatten the bottom half while using the other hand to slightly pull downward.
- Do the same for the upper half to flatten the wider end into a triangle base about the same width as your butter stick.
- Place a butter stick at the wide end and roll down toward the point, gently tugging for tension.
- Keep the seam side down on the tray.
Final proof
- Place rolls on non-stick baking tray (no parchment paper) with space between them.
- Cover and let rise until doubled in size.
Bake
- Preheat oven to 450°F (232°C).
- Just before baking, spray each roll generously (about 20 pumps) for added steam.
- Lower oven to 400°F (204°C) and bake for 12-15 minutes, rotating the tray halfway if needed for even browning.
Serve
- Enjoy hot out of the oven — the bottoms will be crisp and buttery, the insides fluffy and soft.