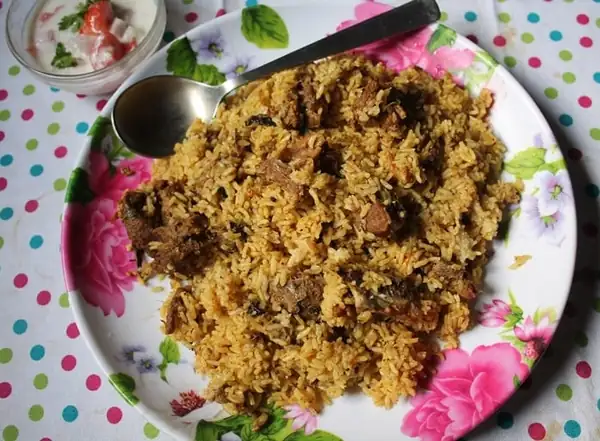
Pressure Cooker Mutton Biryani Recipe
Mutton Biryani is a rich and aromatic rice dish cooked with tender mutton pieces, flavorful spices, and basmati rice. This version is a pressure cooker-style biryani, which saves time but still gives you that deep, layered flavor.
- 2 ½ cup Basmati Rice
- 4 cups Water
- 3 tbsp Oil
- ¼ cup Ghee
- 2 large Onion (peeled & sliced thinly)
- 2 large Tomatoes (chopped finely)
- 2 tbsp Ginger Garlic Paste
- ¼ cup Mint Leaves (chopped finely)
- ¼ cup Coriander Leaves (chopped finely)
- 1 tbsp Chilli Powder
- 2 tbsp Coriander Powder
- 1 tsp Turmeric Powder
- 1 tbsp Garam Masala Powder
- 1 tsp Cumin Powder
- Salt to taste
- 400 grams Mutton
- 1 cup Plain Yogurt
- 2 tbsp Ginger Garlic Paste
- 3 tbsp Mint Leaves (chopped finely)
- 3 tbsp Coriander Leaves (chopped finely)
- 1 tbsp Chilli Powder
- 1 tbsp Coriander Powder
- 1 tsp Turmeric Powder
- 1 tbsp Garam Masala Powder
- 1 tsp Cumin Powder
- Salt to taste
- Pre-Preparation - Start by washing the basmati rice thoroughly and soaking it in clean water for 30 minutes. Meanwhile, marinate the mutton with curd, ginger-garlic paste, mint, coriander, and all the spice powders. This sits for at least 30 minutes (or more if I plan ahead). The longer it marinates, the more flavorful and tender the meat turns out.
- Cooking the Mutton - Transfer the marinated mutton into a pressure cooker and cook it for around 10 whistles. Then reduce the heat and simmer it for another 15 minutes. This makes sure the mutton is cooked until tender and almost falling off the bone. Always wait for the steam to release naturally. It keeps the meat juicy and soft.
- Making the Masala - In the same cooker or a separate kadai, heat oil and ghee, sauté sliced onions till golden brown, add ginger garlic paste, and fry it. Then add chopped tomatoes and cook until they turn soft and mushy. Mix in all the remaining spice powders and salt to form a rich masala paste. The smell at this stage is already enough to make everyone hungry!
- Combining and Final Cooking - Now, add the cooked mutton along with its juices to this masala. Then, mix in the drained basmati rice, fresh mint, and coriander leaves. pour in 4 cups of water and bring the mixture to a boil. Once it starts bubbling, close the lid and cook it on low flame for 15-20 minutes. After switching off, let the biryani rest before fluffing it helps the flavors settle and the rice stay perfect.
Is there any special dish than a biryani on a special day. I think NO..I love biryani, You can see my love for biryani through this link. I have posted quite a few biryani recipes in my blog. This is my second mutton biryani recipe, the first one is a dum style.
After posting that, I wanted to try a simple pressure cooker style biryani, and finally I made it. It turned out so yummy and flavourful.
About Pressure Cooker Mutton Biryani
This mutton biryani recipe came about when I wanted to try a quicker version without compromising on flavor. I've already posted a dum-style mutton biryani before, but this one's a pressure cooker version and honestly, it turned out just as delicious. if not more comforting.
The mutton becomes so tender and juicy after being marinated and pressure cooked, it just melts in your mouth. And the rice, after cooking along with the meat, soaks up every bit of that rich, spiced broth.
We always serve this biryani with a chilled bowl of onion raita and a simple boiled egg placed right on top. It's our go-to combo. Sometimes I even add a crunchy papad or a small bowl of pickle on the side, which takes it to another level.
It's a full meal on its own, filling and flavorful. And every single time I make this, the entire house smells like a celebration like something special is cooking. Honestly, it's one of those dishes that brings everyone to the dining table without even having to call them.
Similar Recipes
The marination step is honestly what makes this biryani so flavorful. The mutton is mixed with curd, spices, mint, and coriander, which helps soften the meat and soak it in all that flavor.
The cooking is done in two smart stages first, pressure cook the marinated mutton so it's soft and tender. Then cook it with rice and the masala, which lets every grain soak up those meat juices and spices.
I'm a big fan of biryani in general, and this particular recipe holds a special place for me because it was the first biryani I cooked on my own without any supervision.
I remember following this exact process, slightly nervous about the results but when I opened the lid, the aroma told me I had nailed it.
That moment gave me so much confidence, and since then, this has been my go-to biryani recipe whenever I want to impress or just treat myself.
Mutton (¼ kg): Going for fresh bone-in mutton makes a big difference. The bones release a lot of flavor into the curry and give that rich, slightly meaty taste we all love in biryani. Pressure cooking it after marinating makes the meat really soft and juicy, almost falling off the bone.
Curd/Yogurt (1 cup): Curd is not just for flavor it helps break down the meat and makes it tender without needing any artificial tenderizers. It also adds a gentle tang that balances out the heat and spices in the biryani beautifully.
Ginger Garlic Paste (2 tbsp): A must in any biryani! It gives a deep, bold flavor right from the marination to the final masala. It removes any raw smell from the meat and creates a good foundation for the rest of the spices to sit on.
Mint and Coriander Leaves (¼ cup each): These fresh herbs lift the entire dish. Mint adds freshness while coriander gives an earthy depth. Together, they cut through the richness of the ghee and spices and make the biryani feel well-balanced and aromatic.
Spice Powders - I used Chilli Powder (1 tbsp) & Coriander Powder (2 tbsp), Garam Masala (1 tbsp) & Cumin Powder (1 tsp).
Onions (2 large, sliced) & Tomatoes (2 large, chopped): The onions are fried until golden brown and bring sweetness and depth to the masala. Tomatoes break down and give body and a slightly tangy base that brings the entire curry together.
Basmati Rice (2½ cups / ½ kg): Always choose long-grain basmati for biryani. When soaked and cooked properly, it stays separate and fluffy, and absorbs all the flavors from the meat and spices. It's the soul of a good biryani.
Ghee (¼ cup) & Oil (3 tbsp): Ghee adds that signature richness and aroma, while oil helps in cooking the onions and spices evenly. The mix ensures the biryani isn't too heavy but still has that festive richness.
Expert Tips
Soak your rice: This is one of those simple steps that really makes a difference. Soaking basmati rice for around 30 minutes before cooking helps the grains cook more evenly and stay separate. You get that lovely, long, fluffy biryani rice instead of something sticky or clumpy. It only takes a few minutes and is totally worth it.
Marinate longer if possible: The recipe says to marinate for 30 minutes, which works but if you've got the time, try marinating the mutton for 2 hours or even overnight in the fridge. It allows all the spices and curd to really get into the meat, making it more tender and flavorful. It's a small effort with a big payoff in taste.
Rice Cooking Tips - Always soak basmati rice for at least 30 minutes before cooking. This helps the grains cook evenly and stay long and fluffy. When it comes to water, use a 1:1.5 or 1:2 rice-to-water ratio depending on how tightly your pressure cooker seals. This balance prevents the rice from becoming too dry or too soggy.
Handle Rice Gently - Once you've added the rice to the masala and water, avoid stirring too much. Over-stirring can break the rice grains and turn the biryani mushy. Just give it one gentle mix and let it cook undisturbed. It'll come out perfect.
Storage Tips - If you have leftovers, store them in an airtight container and pop it into the fridge. The biryani stays good for up to 2 days. When reheating, place a damp paper towel over it if using a microwave. This keeps the rice soft and stops it from drying out.
Serving Suggestions - This mutton biryani tastes best when served hot, straight from the pot. We usually enjoy it with chilled onion raita which cools down the spices a bit. A couple of boiled eggs on top, a squeeze of lemon, and maybe some papad or pickle on the side are simple, but so satisfying.
Q: Can I use chicken instead of mutton?
Yes, you absolutely can! Just remember that chicken cooks much faster than mutton. So, you don't need to pressure-cook it for long, maybe just one or two whistles or even a slow simmer for 15-20 minutes is enough. Also, bone-in chicken works best for flavor.
Q: My rice turned mushy. What went wrong?
This usually happens if there's too much water or if the rice was stirred too much while cooking. Another reason could be high heat biryani needs a gentle simmer. Always use the right rice-to-water ratio and let the steam release naturally after cooking.
Q: Can I cook this in a regular pot instead of a pressure cooker?
Yes, it's totally doable. But make sure to pre-cook the mutton until it's soft before adding it to the pot with rice. Also, keep an eye on the water while cooking so it doesn't dry out or get too wet. Cover it tightly with a lid to trap the steam.
Q: Can I make this biryani ahead of time?
Yes, you can! In fact, biryani often tastes even better a few hours later as the flavors settle in. Just store it in the fridge and reheat gently. When serving, add a little ghee or a splash of water before reheating to bring back the moisture and aroma.
Mutton Biryani Recipe (Pressure Cooker Biryani)
pressure cooker-style biryani, which saves time but still gives you that deep, layered flavor.
For Biryani masala base