Easy Yakiniku BBQ in a Frying Pan Recipe
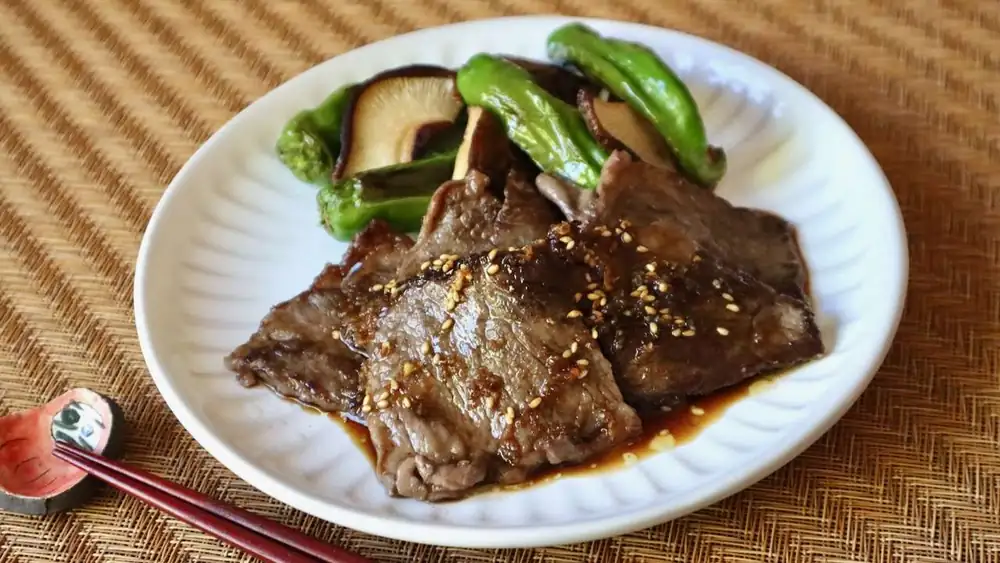
Easy Yakiniku BBQ in a Frying Pan is exactly what it sounds like — classic Yakiniku barbecue, made right in a frying pan. It’s incredibly easy and quick, with no BBQ grill to set up and no messy cleanup afterwards.
- 12 oz sliced beef (short rib, loin)
- 1/4 tsp salt
- 1/2 Tbsp oil
- 2 Tbsp soy sauce
- 1 Tbsp sugar
- 1 Tbsp sake
- 1 Tbsp mirin
- 1 clove garlic (grated)
- 1 inch ginger (grated)
- 1 Tbsp sesame oil
- 1 tsp sesame seeds
- Cut the sliced beef into 3–4 inch pieces (7.5–10 cm) and 1/4 inch thick. Remove the beef from the refrigerator and let it come to room temperature.
- Meanwhile, combine all the sauce ingredients in a small saucepan and bring to a boil. Remove from heat and set aside.
- Once the beef has reached room temperature, sprinkle a little bit of salt. Heat oil in a frying pan over medium-high heat. Sear the beef slices until lightly browned, then turn and cook the other side. Do not overcook the meat or overcrowd the pan. Remove the meat slices from the pan as they are done.
- Serve the beef with the sauce poured over the top.
What’s Easy Yakiniku in a Frying Pan?
Yakiniku — literally “grilled meat” — has a surprisingly layered history. While grilling meat over fire is ancient, the modern yakiniku culture in Japan traces its roots to the post-WWII era, heavily influenced by Korean immigrants who brought their own barbecue traditions. Over time, Japan took those influences and developed something distinctly its own — a refined, almost ritualistic dining experience built around small, carefully prepared cuts cooked right at the table. Today, yakiniku is a deeply social occasion. Going out for yakiniku is a celebration — birthdays, after work with colleagues, family dinners. The smoky aroma, the sizzle of the grill, and the unhurried pace of cooking and eating together are all part of the experience.
One of the joys of Yakiniku is the sheer variety of cuts on offer, each with its own texture, fat content, and ideal cooking time. While pork and chicken also appear on many menus, beef is the undisputed star. Among beef cuts, short rib called Karubi is the crowd favorite — rich, fatty, and usually the first thing people order. Loin cuts (Rosu) like ribeye or sirloin are leaner than Karubi but deeply flavorful. For something in between, skirt steak (Harami) is tender and juicy with a bold, beefy flavor despite being an offcut. Tan, or beef tongue, is sliced thin and typically served with lemon and salt — a must-try for first-timers. For those after something truly premium, flat iron steak (Misuji) is beautifully marbled and melt-in-your-mouth tender. There is no right or wrong cut to use at home — we used short rib slices, but just find your favorite cut of beef and enjoy it.
Yakiniku is at its best cooked over a commercial-grade gas grill or charcoal, but the beauty of making it in a frying pan is just how easy and quick it is. No need to prepare a charcoal grill or preheat a gas grill out in the yard. A frying pan on the stovetop does a perfect job. Simply bring the meat to room temperature before cooking, then cook over medium-high or high heat — and that’s it. There’s something genuinely relieving about knowing there’s no BBQ grill to scrape down afterwards, and no charcoal to deal with. Delicious Yakiniku can be on the table as a regular weeknight dinner, and honestly, the taste is barely compromised.
Yakiniku Sauce and Seasonings
Yakiniku sauce or Tare— is the soul of Japanese Yakiniku. Most restaurants have their own house Tare.In general, Yakiniku sauces fall into a few styles. Shoyu-based Tare is the most common, with soy sauce as the base balanced with mirin, sake, sugar, garlic, and sometimes fruits for natural sweetness and tenderizing enzymes. Miso-based Tare is richer and earthier, and pairs particularly well with pork or offal. Shio Tare, a light salt-based sauce with sesame oil, garlic, and green onion, is reserved for premium cuts where you don’t want to overpower the meat’s natural flavor.
Beyond Tare, a few simple seasonings go a long way at the Yakiniku table. A dipping bowl of sesame oil and salt is a classic, especially alongside beef tongue. Grated daikon is refreshing and acts as a palate cleanser between bites, while wasabi or Yuzu Kosho (citrus and green pepper paste) adds a welcome kick of heat and brightness. A good Tare can truly make or break the dish — which is why store-bought Yakiniku sauce has become a pantry staple in Japanese homes, and why making your own from scratch is such a worthwhile effort.
Tips for making Yakiniku in a Frying Pan
- The ideal thickness for the meat is around ¼ inch (6 mm). This is chunky enough to have a satisfying bite, but thin enough to eat in one piece without needing a knife and fork.
- Bring the meat to room temperature before cooking to prevent the juices from running out too quickly. Sear over high heat, and be careful not to overcook — the meat toughens up fast.
- Our Yakiniku sauce recipe is soy sauce-based, and easily adjustable to your taste. Feel free to increase or decrease the sweetness, or dial the ginger and garlic up or down depending on your preference.
- Grill vegetables like onions, eggplant, and bell peppers in the same pan to round out the meal — everything comes together in one pan with no extra washing up.
Instructions
- Cut the sliced beef into 3–4 inch pieces (7.5–10 cm) and 1/4 inch thick. Remove the beef from the refrigerator and let it come to room temperature.
- Meanwhile, combine all the sauce ingredients in a small saucepan and bring to a boil. Remove from heat and set aside.
- Once the beef has reached room temperature, sprinkle a little bit of salt. Heat oil in a frying pan over medium-high heat. Sear the beef slices until lightly browned, then turn and cook the other side. Do not overcook the meat or overcrowd the pan. Remove the meat slices from the pan as they are done.
- Serve the beef with the sauce poured over the top.