Caramel-Stuffed Chocolate Cupcakes
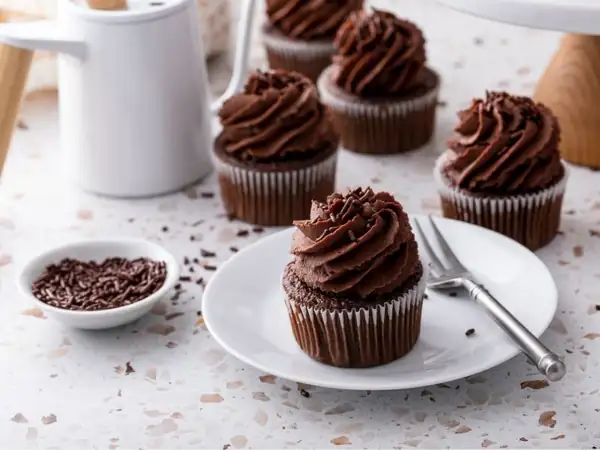
These Caramel-Stuffed Chocolate Cupcakes are deliciously moist, with big swirls of vanilla buttercream and a gooey caramel center. The best part? They’re topped with homemade gold caramel skulls!
- 6 oz unsalted butter (at room temperature)
- 4.75 oz granulated sugar ((2/3 cup))
- 5 oz brown sugar ((2/3 cup), packed)
- 2 large eggs (at room temperature)
- 2 tsp vanilla extract
- 7.8 oz all-purpose flour ((1¾ cups))
- 3 oz unsweetened cocoa powder ((1 cup), sifted)
- 1½ tsp baking soda
- ½ tsp salt
- 8 oz buttermilk ((1 cup), at room temperature)
- 4 oz sour cream ((1/2 cup), at room temperature)
- 2 tbsp water (or brewed coffee)
- 1 oz water ((2 tbsp))
- 2.25 oz light corn syrup ((¼ cup))
- 7 oz granulated sugar ((1 cup))
- 6 oz heavy cream ((¾ cup))
- 2 oz unsalted butter ((¼ cup), cubed)
- ½ tsp sea salt
- ½ tsp vanilla extract
- 4 fl oz pasteurized liquid egg whites ((1/2 cup))
- 16 oz powdered sugar ((4 cups))
- 1/4 tsp salt
- 16 oz unsalted butter ((4 sticks, or 2 cups), at room temperature)
- 1 1/2 tbsp vanilla extract
- 1 cup gold sparkling sugar
- Edible cupcake toppers (try Chocolate Caramel Skulls for Halloween)
- Prepare to bake: Preheat the oven to 350° F (177° C). Line cupcake pans with 24 paper wrappers.
- Cream the butter and sugars: Add the softened butter and both sugars to the bowl of a large stand mixer fitted with a paddle attachment. Beat them together on medium-high speed, until light and fluffy, about 5 minutes.
- Add eggs and vanilla: Add the eggs one at a time, beating well after each addition. Add the vanilla extract and mix it in.
- Combine drys and wets in two separate bowls: In a separate bowl, sift together the flour, cocoa powder, baking soda, and salt. In a different bowl, whisk together the buttermilk, sour cream, and water (or coffee, if using).
- Alternate adding drys and wets into batter: With the mixer running on low, add a quarter of the sifted flour mixture. When the flour streaks have almost all disappeared, add a third of the liquid to the mixing bowl. When that’s incorporated, continue to add the drys and wets in an alternating pattern, ending with the dry ingredients.
- Finish mixing by hand: When the dry ingredients are nearly incorporated, stop the mixer. Scrape down the bottom and sides of the bowl with a rubber spatula, and finish mixing the cake by hand.
- Bake and cool: Scoop the batter into the cupcake pans. Bake for 20-22 minutes, until the tops spring back when lightly pressed. Cool completely before decorating.
- Dissolve sugar in water and corn syrup: Combine the water, light corn syrup, and granulated sugar in a medium saucepan. Place the pan over medium heat, and stir while the sugar dissolves. Brush down the sides of the pan occasionally with a wet pastry brush to remove stray sugar crystals as the mixture comes to a boil.
- Cook without stirring: Once the mixture is boiling, stop stirring and insert a candy thermometer. Allow the sugar to cook, undisturbed, until it is a medium amber color and reaches 330° F (166° C) on the thermometer.
- Simmer cream, butter and salt: While the sugar cooks, combine the cream, butter, and salt in a small saucepan. Place the pan over medium heat and bring the cream to a simmer. Once simmering, remove the pan from the heat and set aside.
- Add cream mixture to sugar mixture: When the caramel has reached 330° F (166° C), add the hot cream to the pan carefully—it will splutter, boil, and steam quite a bit, so stand back from the pot! Stir the cream and caramel together and continue cooking the mixture, stirring occasionally, until it reaches 232° F (111° C).
- Finish caramel and cool: Remove the pan from the heat and stir in the vanilla extract. Pour the caramel into a heatproof bowl or baking pan. Let it sit at room temperature until it is entirely cool and thickened. The texture of the caramel should be easily scoopable with a spoon, but mostly hold its shape while dripping very slowly off the spoon.
- Make-ahead: The caramel can be made in advance and kept at room temperature for a week before using. If making it in advance, simply press a layer of cling wrap on top of the caramel until ready to use.
- Mix whites, powdered sugar, and salt: Combine the whites, powdered sugar, and salt in the bowl of a large stand mixer fitted with a paddle attachment. Mix everything together on low speed, until the sugar is moistened and no dry patches remain. Turn off the mixer, scrape down the sides and bottom of the bowl with a spatula, then turn the mixer to medium speed. Beat on medium for 5 minutes.
- Add butter and vanilla: After 5 minutes, turn the mixer to medium-low and start adding the softened room temperature butter, 1-2 tablespoons at a time. Once all of the butter is incorporated, add the vanilla extract and mix it in. Stop the mixer and scrape down the bottom and sides once more. Turn the speed to medium and beat the buttercream for 10 minutes. The finished buttercream will have a wonderfully light, creamy texture.
- Make-ahead: If you don't plan to use the frosting right away, it can be covered and stored in the refrigerator for up to two weeks, or the freezer for up to two months. Frozen frosting should be thawed in the refrigerator. Allow chilled frosting to come to room temperature and then beat it for several minutes to smooth it out and restore its texture.
- Fill: Use a sharp paring knife to cut a cone-shaped hole out of the top of the cupcakes. Scoop a big spoonful of caramel into the hole, coming almost all the way to the top. Cut the bottom off of the cupcake cone, and replace the top of the cupcake on top of the caramel. (The unused portion of the cupcake cone can be eaten or thrown away—I trust you will find something to do with it, lol.)
- Frost: Once all of the cupcakes are filled, put the frosting into a pastry bag fitted with a large star tip such as Ateco #867. Pipe the frosting on top in one big decorative swirl.
- Finish: Put the gold sparkling sugar in a shallow bowl, and press the sprinkles against the bottom of the frosting to form a ring of sprinkles going all the way around. If desired, place each cupcake in a gold filigree wrapper, and top with dedible decorations.
These Caramel-Stuffed Chocolate Cupcakes are these cupcakes are dang good. Make that DAAAAAANG GOOD. They start with a moist chocolate cupcake that’s stuffed with soft, gooey caramel. I’m talking about the kind of caramel that starts slowly oozing from the cupcake as soon as you bite into it, creating a thin string of caramel between your mouth and the cupcake, leaving a very unbecoming—but delicious—strand of caramel hanging down your chin. I didn’t say they were dang dignified, now did I?
I found it helpful to use a candy thermometer while making the caramel. If you are new to using a thermometer, check out my guides for how to use a thermometer and how to test and calibrate a thermometer correctly.
The cupcakes are topped with big fat swirls of vanilla buttercream, and finished with what can only be described as the classiest, tastiest, gold shiniest chocolate-caramel skulls.
Oh yeah, we’re going there. Believe it or not, these glittering gold beauties are 100% homemade, and you can make them too! First you’ll need a cheap plastic skull candy mold. I got mine at a local craft store, but fortunately for us, Amazon’s got our backs so we can all make realistic 3D skull candies. You’ll also want to pick up some gold and copper luster dust if you want to give them a similar burnished gold color.
There are full instructions for making the skulls below, but here’s a little photo tutorial to help you through the process. It’s not hard, but it is time-consuming because you’ll need to make them in batches unless you buy multiple molds. And if they’re not perfect, the luster dust covers a variety of sins. Fingerprints? Smushed or blurry features? Add some shine to that baby and no one will notice!
Finally, the cupcakes were finished with a few more glittery touches—a ring of gold sparkling sugar and gold filigree cupcake wrappers. I mean, I love gross and creepy Halloween desserts as much as the next girl, but sometimes we just need to class it up a little with our spooky sweets, am I right?
Trust when I tell you that these cupcakes were worth the year’s wait to post! They taste like a candy bar, look like a million bucks, and give you the rare opportunity to pop a skull into your mouth and crunch down. Win-win-win!